Friday, December 23, 2011

Rudoph pendant set


Two days ago, I opened my email account and saw a very fun and inspiring post by Alyson Stanfield about the story of Rudolph but what truly caught my eye was the beautiful image she had used it had been a sketch of Rudolph by Katherine Tyrrell . I commented on twitter and she replied back and so on and it suddenly hit me what would Rudolph look like in enamel? So here he is folks, Rudolph in cloissone enamel on copper. In this photograph I have just finished laying the wires down on copper with a base coat of flux prior to its trip in the furnace.  

Here he is with a his colours all wet-packed (placed on the piece with the help of a brush) on and waiting for the temperature in the furnace to be just around a cozy 750 degress C :D 
I gave him a more natural brown and I think maybe his nose could have been bigger but guess he can show Santa the way just fine with this one :) Here he is with a matched set of holly earrings just for that extra Christmas feel !

   
Rudolph pendant with holly earrings, Vitreous enamel on copper
© 2011 Nayna Studios™


Thursday, December 22, 2011

DIY tips! Make your own tools !


A flower stand re-used as file stand
One of the perks of being a jewellery artist for that matter an artist working in any medium, we all get to be pack rats and actually call all that stuff  ' Tools & Equipment' :D Just kidding, but if I look at my studio which I now have for more than a year it has changed drastically with so many more 'Tools and Equipment' than what I started out with. Not all of it is the expensive-bought-from-that-amazing-tool-place kind, in-fact quite a few of the small stuff is actually recycled form its previous existence as a mundane object into a specialty tool ! I would like to share a few such pieces with you today,  one such is my mother's old flower stand. This is basically a stand which sits inside a flower vase and individual flower stems are stuck into each groove, allowing the flowers to stand upright. Well I am not really the flower arranging type so well, I simply arrange my hand files into it and voila! they can be found at a moments notice! ( Not that my jeweler's bench is messy you understand :D )
         This next one is a bit of a DIY project , if you live in Mumbai and own a furnace, and unless your furnace manufacturer has been kind enough to provide a firing rack, you are on your own ! Well I lucked out in this case, a steel and iron mesh guy in the city had some of this perforated steel mesh scrap left over and gave it to me for about a hundred bucks and yours truly simply fit it in the bench vise and hammered the sides to create legs :) Unfortunately I have not been able to find some smaller scrap for my jewellery furnace :(

Most jeweler's I know usually use something more delicate for their soldering needs, well I not like most jewelers as you know, I am first and foremost a metal artist, so instead of a small firing pad, I use a left over fire brick from some repairing that was done on my furnace door a few years ago. :) This really helps in alleviating neck strain while soldering all those tiny findings.


    I currently own a set of jump ring dowels, but back when I had no idea that such a tool even existed this was my makeshift dowel, The sawed off portion of our old 14 " TV antenna :D Yup your read that correct, this little device really bailed me out. With LEDs and Plasma TVs antennas are out but the old devices used to have this hollow pipe set which was essentially a set of four pipes of different dimensions set in such a way that you could extend the antenna to the required height.


   Last but not least a set of DIY wooden mallets, I am particularly proud of, I made these back in my college days using believe it or not a rolling pin! My father found a really nice rosewood rolling pin and I simply cut it in three parts and had a college peon attach handles to the center of the mallet heads and there you go custom mallets ! They were such a hit one was even flicked by an old college mate :P
Now that I recall it was my professor's idea to use the rolling pin, it's been fifteen years and they are still extremely useful !

 A parting tip, can't get small enamel spoons at your local supplier's use my idea start saving all the tiny stirrers that nice coffee houses give with their take away or even cup coffees. P.S. Mc Donald's is my favorite !

Tuesday, December 20, 2011

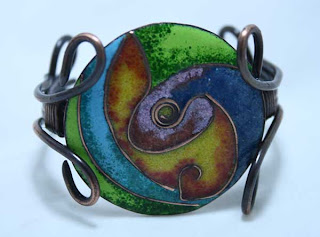
The Eye of the storm

The Eye of the storm, Vitreous enamel, copper wire
© 2011 Nayna Studios ™
The central motif of this cuff is among some of the enameled medallions in various shapes that I keep creating and then get completely stuck as to how to go about setting them. This particular piece had actually been done with its last firing about a y ear and a half ago! I would periodically take this one out and wonder as to how I was going to set it and then again end up putting it back completely at a loss for ideas. Then one day two weeks back out of the blue I suddenly had a thought that this little piece would perfect as a cuff and thus this final piece was created! 
 My father seems to think it looks like a contemporary large dialed watch !! I truly hope not :D !!
The Eye of the storm, Vitreous enamel, copper wire
© 2011 Nayna Studios ™

Sunday, December 11, 2011

Two sided pendant

Two sided pendant,Copper and Vitreous enamel
©2011 Nayna Studios™
Two sided pendant, reverse side
I had worked on the  central enameled cab of this piece about six months ago, but a suitable setting simply eluded me! I tried to create a simple bezel with added prongs for security but this simple did not work for me aesthetically speaking and I let the cab sit in my 'to be set later' box (its an old ice-cream box just to make it more fun :P) while I went on with other projects. But recently It struck me to make the setting so that it could be worn on both the sides. So the counter enamel got a coat of blue and a pierced backing to the setting.
Enhanced by Zemanta

Thursday, November 10, 2011

Boxed (in) a bracelet

Box Chain Bracelet
Copper
© 2011 Nayna Studios™
Last week has been all about experimenting with and trying out different chain maille weaves.This is the latest to join my list of chain maille success stories . A snug box chain weave, that for some reason though intended as a bracelet, actually has some amazing possibilities as an anklet and quite possibly a necklace! Not entirely sure but will be trying out these two avatars for this weave soon. Meanwhile the bracelet is looking a stunner I think , what say?

Tuesday, November 8, 2011

Wrapped Hearts

Wrapped hearts, copper, vitreous enamel, &red stone drops
© 2011 Nayna Studios™


Having enameled these hearts, I realized I hadn't drilled holes for the bail :( you know how it is you get carried away with the process and forget to keep the technicalities in mind)  So I went ahead and enameled these lovely hearts and then realized that my enamel had completely blocked the holes I had drilled to hang the bail :( Well A true jewellery artist never despairs and so I proceeded to wrap these hearts in a snug wire wrap that not only hold the hearts in place but also allowed me to hang these gorgeous red drops!

Sunday, November 6, 2011

Taming the bead monster!

My newest bead box


If you have been following this blog for any length of time, you must know by now that I am first a metal artist and then a jewellery designer which is why beads are more of second thought in most of my work, but that does not mean that I am not completely crazy about beads! Let me assure you it takes a whole lot of will power to not spend my entire shopping budget in the bead market ( worse I recently met someone who assures me I have not yet tapped two of the biggest bead markets here in Mumbai !!) Woe is me the day I go to those markets but nonetheless I have now a sizable collection of beads and I figured it was time I allowed myself to splurge on a box with compartments (one more object I cannot resist, I currently own three jewellery boxes for my own collection ! )
             Finally the week before Diwali and I was out hunting for fabric, lace chocolate, and gel wax ( in that order for the Diwali celebrations! ) and I found the perfect multi-slotted box that you can see here. I was so happy to finally sort all my beads out with proper slots for each kind. But you guessed it , ran out of space before all my beads were sorted!! So I guess a few more visits to the bead shop and I will be ready for an upgrade :D Meanwhile what do you think of this arrangement?

Thursday, November 3, 2011

Double wrapped gypsy bracelet

Double wrapped Gypsy Bracelet,
Copper wire, yellow & pink Agate, white metal and glass beads in various colours
© 2011 Nayna Studios™

Going through my bead box I was tempted to put all of those amazing beads into one creation and I happily kept wire wrapping and looping and before I knew it I had an extra long bracelet that had to be double looped and it just occurred to me why not double wrap it ! So that's how my double wrapped gypsy bracelet came about. Of course I could not resist adding a few copper wire charms and the toggle clasp actually sits a few beads before the end of the bracelet length, hey you know me something about my jewellery has to be quirky :D

Wednesday, November 2, 2011

Beaded Cuff

Beaded Cuff, Copper, Green glass beads
© Nayna Studios™
Beaded Cuff, Clasp detail
© Nayna Studios™


All of the week before last I had been furiously trying to create stock of jewellery for my Diwali show at a shopping complex here in my own city . Having created a slew of pendants earrings and just barely a cuff for my wristwear collection, by the end of the week I was wondering what was I going to show case in that category! Fortunately for me my muse smiled and this is what came about :) The design part of the cuff fits snugly against the wrist and the beads add just the right touch of colour and festive look to the wrist. The locking mechanism is inspired by a similar style used in ethnic Indian jewellery to secure large Kundan and diamond studded jewellery. For this piece you have to bring together both the pieces as if to form a hinge and then secure the pin through the hollow pipe thus formed. What do you think of this clasp, does it work for this piece ?

Monday, October 31, 2011

Eggy pendants

Eggy pendants, Enamel on copper, shell and glass beads
© 2011 Nayna Studios™
Enameled pendants with bead danglers! Too gypsy do you think? I wanted to do something different with my enamel this time rather than going with any traditional enameling technique as the design element.  With Diwali in mind I used beads and wire spirals to make these enameled eggs come to life :)What do you think will look good ribbons or cords to colour co-ordinate with outfits?

Sunday, October 30, 2011

Scroll work

Scroll pendants set, copper wire
© 2011Nayna Studios ™
Scroll pendant set, Copper wire
© 2011 Nayna Studios ™
Recently I came across some scroll pendants in a jewellery book and decided to try them out, they just came out so cute that I couldn't resist and ended up creating about six sets! Here are some of them do you think they would look better in silver or perhaps with some beads?
Scroll pendant set, Copper wire
© 2011 Nayna Studios™


Thursday, September 29, 2011

Gypsy Earrings

 
Gypsy Earrings, Copper and crystal beads
© Nayna Studios™
        I decided to go a little gypsy this time :) These lovely earrings are not exactly of the chandelier style nor are they traditional Indian Jhumkas, but rather a more free spirited rush of colours! I had so much fun making these, they did take a long time nearly two whole days but the final results were well worth it. Getting the wire lengths exactly right so they looked similar after the loops had been wrapped took the longest time. Thinking of making these in different colours what do you think?

Wednesday, September 28, 2011

Weaving Persian style!

Weave About, Copper and Brass
© 2011 Nayna Studios™
     
        The latest in my chain maille a Persian weave that I am trying out for the first time ever. Wanted to add beads but couldn't find anything that was really adding to the look. I guess sometimes keeping it simple helps. Though nothing simple about the weave itself! Easy once I got the hang of it yes but initially I really thought I was messing it up :D Am planning on trying all copper soon to check out that look. What do you think should I add beads or will that simply clutter up this beautiful weave??

Friday, September 23, 2011

First ever earrings with posts by me !!


          Over this last weekend, I had the first ever home show for my jewellery at the home of an old friend. While I managed to make substantial sales, one of my clients completely threw me off by asking if I could make a matched set of earrings, for her . Now I know that you must be wondering, what in heavens name is so difficult about a matched set of earrings, well nothing except she is a woman in her sixties and wanted earrings with posts rather than ear wires! Well that stumped me momentarily as I have never been able to create earrings with posts prior to this, I have tried of course but could never manage to figure out the right gauge of metal or the particular shape suited for the locking mechanism. Not wanting to disappoint the client ( who also happens to be my friends mother and a a very sweet lady ) I promised her to make the matched pair mentally noting to buy a pair of locks and oxidize them to match the finish of the earrings, if I could not create them ( hey anything to please the client right  :P ) but fortunately enough the jewellery gods smiled at me and yesterday for the first time ever I was able to create the proper locking mechanism on my own with 24 ga. copper !! Now I know you must think well so what jewellery artists do this the world over, everyday probably but to me it was quite the achievement and wanted to share it with you so here they are.
Medallion Links earrings with posts
© Nayna Studios™


Enhanced by Zemanta

Friday, September 16, 2011

Green Dreams

Green dreams, Copper, Vitreous enamel
© 2011 Nayna Studios ™
The latest in my captured series, and as a bonus I got to use two of my favorite beads !! These days I am working with setting all my previously done enameled panels. This one had been on my mind for quite a while,and I was not happy with the usual bezel settings and claw settings that I work with. While this piece is not open backed, I think it shows off the enamel to good advantage without covering  too much of the cloisonne work, what do you think? A few more to come in this series, stay tuned!!

Tuesday, September 13, 2011

Nest Egg

Nest Egg, Copper wire Cloisonne Enamel
© 2011 Nayna Studios™

About this time last year I had taken to working on enameled medallions, randomly cut rounds of  copper that I had enameled without thinking of the setting or design aspect of how I was going to incorporate them into jewellery ( my setting skills being non existent at the time :) Recently going through my box of unfinished projects ( I actually have an ice- cream tin for all such projects! ) I found these medallions, four in total and decided to give setting them a try. All you regular readers will know how fond I am of copper wire, so I just decided to create a capture for these medallions with balled up wires. Its a dual bail with space for two jump rings, hopefully I will find the right chains for my Nest Egg !!

Monday, September 12, 2011

Enameled pendants


My latest projects ! Enameled pendants, well these have actually been ready for a while now, but I have run into a block figuring out the setting for them, what do you think would look good? Wire wrapping might obsure the enamel and well my bezel setting skills need a lot more work :( If you have any thoughts do let me know :)
Enhanced by Zemanta

Dimpled Bracelet with blue patina


Dimpled Bracelet with blue and brown patina
© 2011 Nayna Studios™
       Blue is the colour of the season for now in my studio, as the bracelet that I had cooking in a patina recipe turned out gloriously blue!! Well actually a deep red brown with a top layer of blue :D  For those of you who do not practice patina regularly let me tell you that it is as much a science as an art form, if any of the required conditions, temperature, humidity, chemical concentration, metal composition .. ( you know all the metal working  mumbo jumbo )goes wrong and you have something completely unexpected! But then again that is the beauty of patina , you never know what you are going to get and you just might stumble upon some elusive shade that is simply glorious :) As I took the piece out of the patina box (had it locked in with the chemicals inside a plastic air tight box for four days ) it looked initially to have a dark blue tone but after the first washing and drying it over night this is the colour it has matured to.
Dimpled Bracelet without patina
©2011 Nayna Studios™
I made this piece as a play on the pea pod. I have always been fascinated by the form of the pea-pod, the slightly curving pod halves exposing the cute round peas to me is just such a beautiful design. Instead of rounded elements, I have used circular elements curving inwards and all the people that have seen this piece seem to have the opinion that I should add some embellishment inside the circular element that forms the main design, what do  you think a few round pearls or beads would do the trick?
Enhanced by Zemanta

Thursday, August 25, 2011

A knotty affair with a gorgeous sun-stone

Knot Bracelet
©2011 Nayna Studios™
Copper, Sun-stone cabochon


          A few months ago, I had received this beautiful sun stone as a gift from the vendor who sold me some Lapis lazuli cabochons, and it lay forgotten in my bead drawer for a long time. Recently I bought a new jewellery how-to book and came across this knot bracelet idea and immediately thought of  this little cute Sun stone to go in the centre. Now that its looking so good I am thinking of creating earrings to go with it. I believe I may have some of my mother's old Sun-stones lying around, just about to start digging around the cupboards!! I have also seen some gorgeous blue Sun-stones at my bead guy hopefully will get my hands on them the next time :)

Sunday, August 21, 2011

Four tips to find design inspiration

           As someone who was used to working on one piece for the duration of two weeks thinking of a concept, sketching, putting together the metal pieces, wires, enamel colours and spending hours applying colours in between firings, I was used to taking my own sweet time working on my enameled panels.
           But since I started working full time on my jewellery it suddenly hit me 'I needed to have at the very least three to four ideas in progress at the same time!! Also I needed to have a bank of ideas complete with the planning for the process,all set in my sketchbook in advance since making jewellery is so much more complex with regards to the various components that go into the manufacturing process. I need to keep one eye on my supplies while designing making sure that I have the required gauges of wire as well as sheet metal, not to mention my bead drawer!!
So where do I look for inspiration ? My four fail-proof design triggers
Enamel and filigree necklace
Copper, cloisonne enamel
© 2011 Nayna Studios™


  1. My favorite bead store! There is a shop in Mumbai, that can single-handedly offer up hundreds of ideas, they have glass beads, cabochons, pearls, metal beads, semi-precious stones, donuts you name it!! Every time I go there with the intention of spending only a few hundred bucks and end up completely blowing my budget :D My recent captured series is a great example of this. I had bought the glass pieces with no idea of what I was going to do with them but I ended up making these cute pendants with them.
  2. Individual components are just as good as design triggers, sometimes I will look at a particular clasp or a finding and weave a complete design around that component. At other times the way a particular component (and I am partial to clasps here) is used changes the entire look and turns the design around.
  3. My old work, yes it helps to jog your brain by looking at your own old work, no idea about the logic there but it works. I look at an old piece a necklace maybe and it suddenly occurs to me why not work on this on a different scale, vary a technique or maybe make a bracelet with the same technique. 
  4. Last but not least looking at other artists work, this one never fails to start the cogs off! Of course a good amount of time is spent wondering whether I will ever be as good as them but quickly enough that itch to get into the studio and get my hands on some metal take over :)
Drop a line if you have any more ideas, would love to hear them :)
P.S. Can you figure out where the clasp is on this one??

    Thursday, August 11, 2011

    Captured-Glass cabochons

    Glass cabachons, copper, copper wire
    © 2011 Nayna Studios™


                 One trip to my gem dealer and I end up with so many stones beads and unknowns ( some of the stones and beads I am not entirely sure of yet :D. ) This time I ended up picking up what clearly appears to be glass but it so beautifully cut that I could not resist!  Just one problem with the pieces, they had been drilled right through :( .
           As I had wanted to make pendants and not just link them through, I thought of creating wire and metal bezels around them, but as it turned out they are transparent and I wanted to use this as part of the design.
                So I ended up texturing some bases and using wire in one, I am especially proud of the copper roses on the oval one, what do you think too much or maybe needed something more? 
    I let the trapezoid have an open back so that one really gets a bi-colour look , should I have let one of them have a complete open back? Any thoughts??

    Monday, August 8, 2011

    Dress up your fingers with leaf rings

    Leaf ring 1, copper
    © 2011 Nayna Studios ™


    Lately I have become quite interested( actually fascinated is more like it :D ) in fold forming, but as I am out of the required 24 gauge metal to experiment with it, I thought about creating some pieces with just trying to 'turn' the metal with my hammer , so here is what I came up with : I used some copper scrap( 22 ga) cut out some shapes and for some reason all of them seemed to resemble leaves in various stages of drying up !
    To make them more interesting I soldered a few of the nuggets that I periodically save from my  electro-forming experiments ! ( great way to use scrap rather then just sell it to my scrap guy - yup I got a scrap guy too :) gives great deals !)


    While creating the band I was not really sure about the size so I have kept them adjustable so any body can now enjoy them! :) Thinking of calling them 'leaf rings' what do  you think, do they remind you of leaves?? Dried and folded up but definitely the third in the series reminded me of a lily pad what say?
    Leaf ring 4, copper
    © 2011 Nayna Studios ™

    Leaf ring 3, copper
    © 2011 Nayna Studios ™

    Leaf ring 2, copper
    © 2011 Nayna Studios ™

    Tuesday, July 26, 2011

    Captured-Rose quartz

    Rose quartz, Amethyst drops , copper
    ©2011 Nayna Studios
    I had bought these three rose quartz cabochons a few months ago and try as I might I could not come up with any  interesting design to use these. Then a few days back as I kept wondering how to 'capture' these, I figured out exactly how to do that, I decided to create copper wire 'captures for them. Since there were three identical ones, a pendant set with matched earrings seemed like the best approach. Although not conventional in design I think I managed to have a little bit of old world influence in them, what do you think? I am continuing this series as I have quite a treasure trove of cabochons that I managed to hunt out from my bead guy :) In face the next one is a surprise, will be finishing it soon so stay tuned!
    Enhanced by Zemanta